
Imagine you’re all set to hit the road for a weekend adventure, coffee in hand and playlists at the ready. But as you turn the key, the engine coughs and sputters, leaving you stranded. Your heart sinks as you realize you need a jump start. Have you ever considered what you need to do before diving into the task of connecting those pesky jumper cables? While the solution seems straightforward, a few precautions can transform a potential catastrophe into a simple fix. Let’s delve into the essential steps you should take to ensure a safe jump start for your vehicle.
First and foremost, let’s discuss the fundamentals. Before you even think about those jumper cables, it’s crucial to assess the scenario. Are you on a busy road? Is it raining? What about other potential hazards nearby? To illustrate, picture this: you’re parked on a bustling street, the rain pouring around you, and the cars whizzing past. It’s not just about getting your car started; it’s about ensuring your safety as well. Therefore, take a moment to evaluate your environment. Shift your position, if necessary, to a safer location away from traffic if possible. It’s remarkable how a slight change can dramatically improve your safety.
Next, gather the necessary equipment. You don’t want to be fumbling around when the moment arises. A good set of jumper cables is essential. Ensure they are in proper working condition—frayed wires or corrosion can hinder their effectiveness. Check for the appropriate length so you can easily reach between the two vehicles without straining. And while you’re at it, why not familiarize yourself with your vehicle’s user manual? Many modern cars have unique jump start procedures or specific locations for the battery terminals. Ignoring these nuances could lead to mishaps.
Now, let’s have a playful moment: have you ever been caught in a frustrating game of “find the battery”? If so, you know just how annoying it can be. Before encountering the dead battery scenario, familiarize yourself with the battery’s location in your car. That way, you won’t waste precious minutes scrambling under the hood, searching for it in the midst of panic.
Moreover, let’s address the importance of identifying the type of batteries involved. Knowing whether you’re dealing with a conventional lead-acid battery or a newer lithium-ion battery can make all the difference. These two types operate under different principles, and understanding them will help you mitigate risks. If you’re uncertain, don’t hesitate to seek guidance or clarification on the specific requirements of your vehicle’s battery model.
Before proceeding, it’s imperative to don the correct personal protective equipment. You wouldn’t swim without a life jacket, would you? Consider wearing safety goggles and gloves, as batteries can be full of surprises. Acid leaks or sparks from damaged terminals can pose genuine threats. A little precaution goes a long way in maintaining your safety.
Once you’ve prepared your environment and equipped yourself with knowledge, it’s time to consider establishing contact with the owner of the working vehicle. If someone is helping you out, communicate clearly. Make sure they understand the process you intend to follow. A sync in actions can prevent disastrous mistakes. Think of it as a dance; partners must be in tune with each other’s movements.
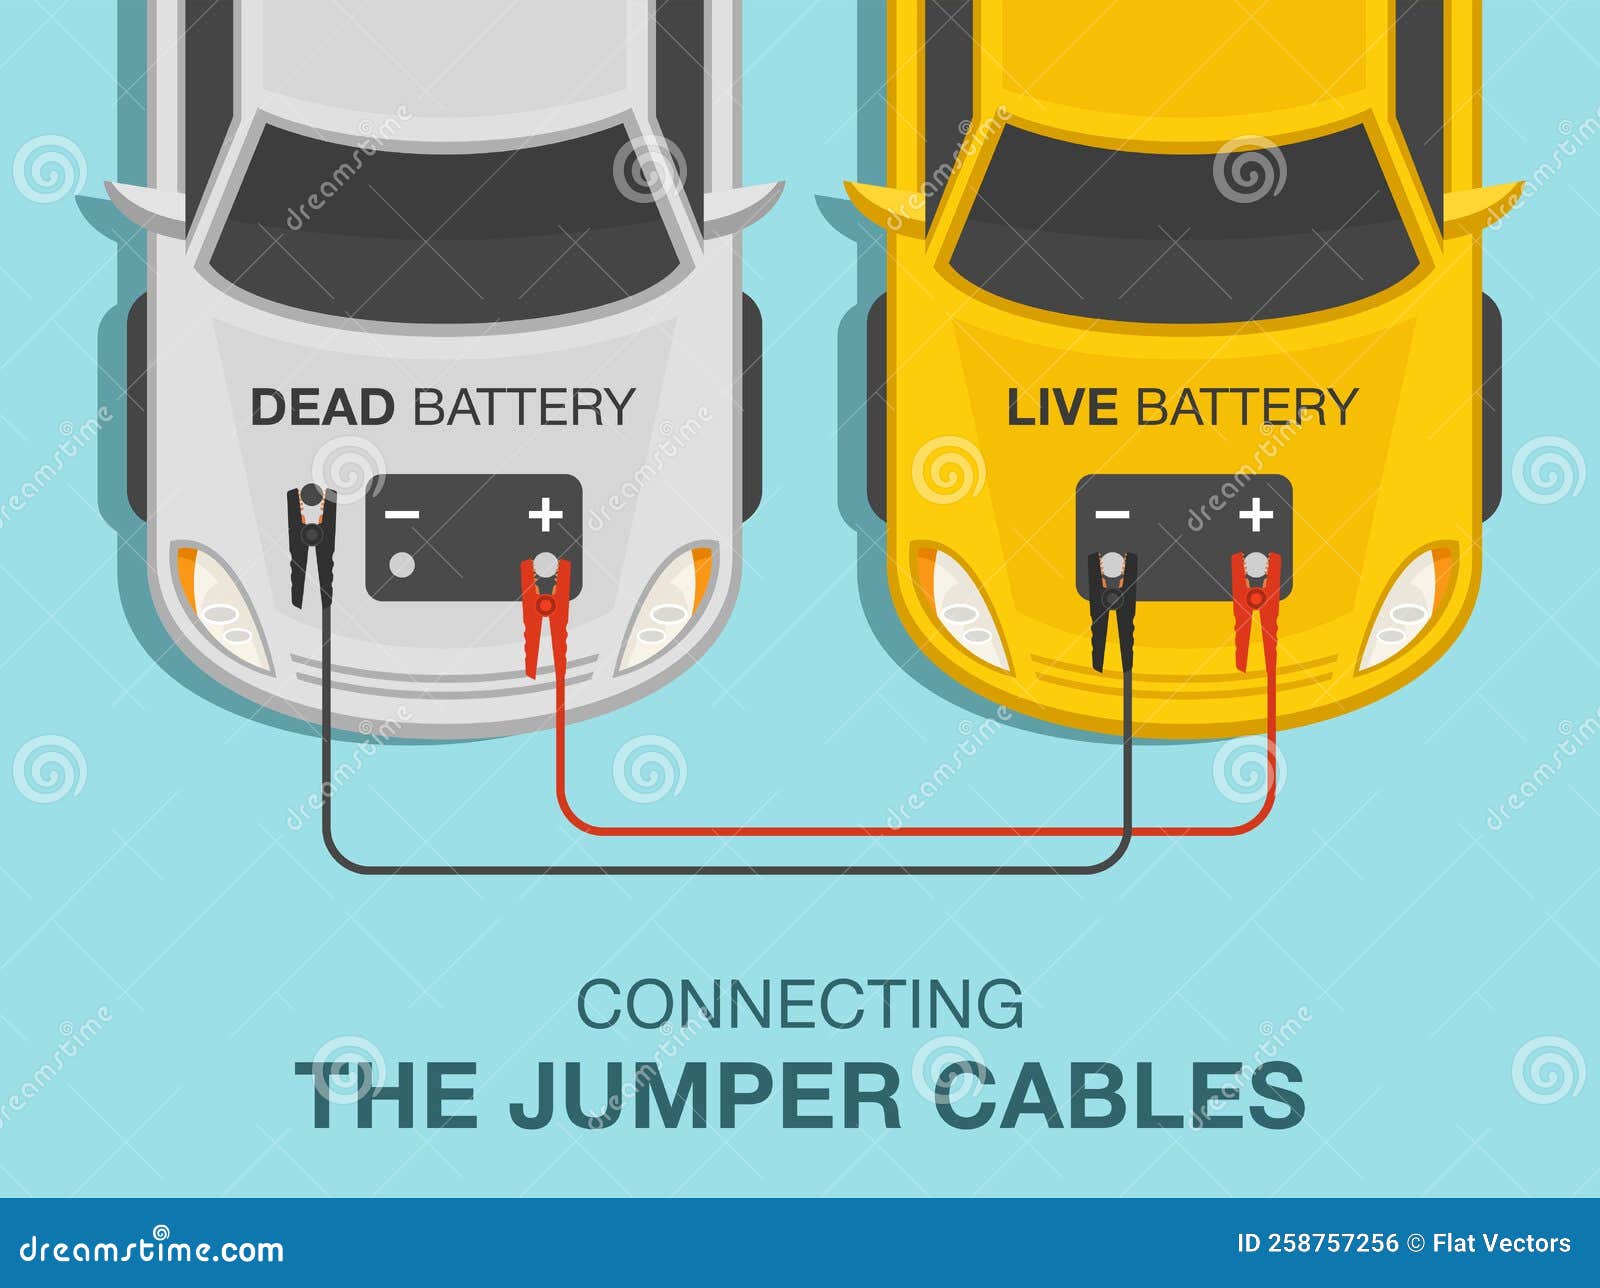
After securing both vehicles, position them close enough to connect the cables but ensure they do not touch. It might be tempting to park them bumper to bumper, but this could lead to a potential accident when the cables are being hooked up. A few feet apart is optimal. Now you’re ready for the next crucial step—connecting the jumper cables.
But hold on—so far, you’ve been taking great care, and in the excitement, you might forget the importance of connecting in the right order. The initial connection should always start with the positive terminal of the dead battery. Then, the other end of that same black sheathed cable connects to the positive terminal of the good battery. After that, connect the negative terminal of the good battery, and finally, attach the other end to a grounded surface on the dead vehicle or to the negative terminal. This order minimizes the chances of sparks that could ignite any hydrogen gas emitted by lead-acid batteries, which often occurs during charging.
Once everything is connected, glance around one last time—make sure that no one is too close and that everything is in place. Then, it’s time to turn on the functioning car and allow it to charge the dead battery. Give it a few minutes before attempting to start the dead vehicle. Patience is indeed a virtue, especially in this scenario.
Finally, as you initiate the once-resilent car engine, you might feel a sprinkle of adrenaline—a mix of anxiety and excitement. If the engine roars to life, rejoice! But if the car remains silent, don’t despair. Troubleshooting the issue might involve checking that all connections were secure and well made. It could also mean that further mechanical assistance is required.
In conclusion, jump starting a car might seem like a straightforward task, yet the process demands attention to detail and safety. Taking those preliminary steps will not only safeguard your physical well-being but also help avoid further complications down the road. So next time you find your car in need of a jump, remember to prepare wisely and prioritize safety—you’ll be back on the road in no time, perhaps a little wiser than before. Happy driving, and may your batteries always be charged!
