
Understanding the intricacies of alternator wiring, particularly the GM 1 wire alternator setup, is crucial for automotive enthusiasts and technicians alike. This guide delves into the wiring diagram, operational principles, and practical considerations when dealing with a GM 1 wire alternator. Structured meticulously, this content offers a comprehensive exploration of the subject.
First, let’s dissect the components of the GM 1 wire alternator system. The alternator itself is a critical device responsible for converting mechanical energy into electrical energy, powering your vehicle’s electrical systems and recharging the battery. In contrast to the traditional multi-wire alternator systems, the 1 wire design simplifies installation and functionality.
One of the primary advantages of a 1 wire alternator is its ease of installation. As the name suggests, it typically requires only a single wire connection to the battery, along with a grounding point, thus minimizing the complexities associated with wiring harnesses. This is particularly beneficial for those operating in confined spaces or custom setups.
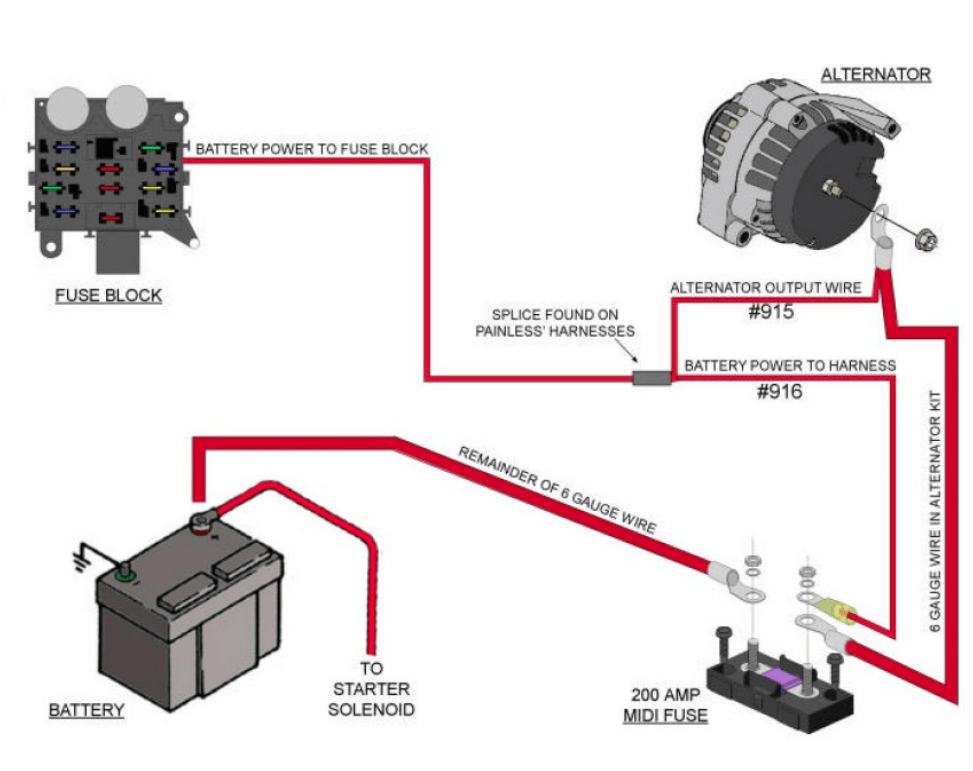
When examining the wiring diagram for a GM 1 wire alternator, a few fundamental terms arise: the output terminal, the battery connection, and ground. Each plays an imperative role. The output terminal connects directly to the positive side of the battery or the positive terminal of the starter. This wire is responsible for carrying the current generated by the alternator, ensuring that your vehicle’s battery and electrical components receive the power they require.
Next, grounding is a pivotal aspect that is often overlooked. A secure ground connection is essential for the alternator to function optimally. For the GM 1 wire alternator, a dedicated ground wire should connect to the alternator’s casing, thereby facilitating proper electrical flow and preventing issues associated with intermittent connections.
Moving on to operational principles, it is vital to understand the excitation process of the alternator. In a typical 1 wire setup, the alternator itself generates the necessary excitation voltage, negating the need for a separate wiring system to supply this power. When the engine starts, the alternator begins turning, generating electricity. Initially, it needs a small amount of voltage to kickstart the charging process. Once this is achieved, the self-exciting feature allows the alternator to maintain output without additional input.
The initial wiring connection plays a decisive role in ensuring that the alternator functions seamlessly. It is advisable to use thick gauge wire for the battery connection to accommodate the amp output of the alternator, ensuring efficiency and durability. Following this installation guideline minimizes voltage drop and potential overheating.
Now, let’s explore common applications and situations where a GM 1 wire alternator is preferred. This type of alternator is particularly favored among hot rod and street rod enthusiasts. The streamlined installation is an asset in projects aimed at achieving a clean and simple engine compartment. Likewise, agricultural machinery and classic cars often integrate this setup, capitalizing on the straightforward design and reliability.
In terms of upkeep, regular maintenance of the wiring and connectors is essential to preserve functionality. Inspecting the connections for corrosion, mechanical damage, or loose fittings contributes to the longevity of the electrical system. Furthermore, ensuring that the alternator’s belt is taut maintains optimal performance and power output.
Despite its appealing simplicity, there are considerations to bear in mind. For instance, some users may experience issues related to battery charging when the vehicle is idling; this phenomenon can be attributed to the RPM-dependent nature of the alternator’s output. Ensuring that the engine operates at higher RPMs typically grants sufficient voltage to recharge the battery effectively.
It is also pertinent to recognize the limitations of a 1 wire alternator. While they are excellent for basic applications, high-performance automobiles or vehicles with extensive electrical systems may require a multi-wire setup to accommodate the additional current demands. A thorough understanding of your vehicle’s electrical needs will guide you in making the right choice.
In summary, installing a GM 1 wire alternator offers a remarkable balance of efficiency and simplicity, making it an attractive option for various vehicles. From the initial wiring connections to ongoing maintenance, awareness of basic operational principles ensures that users can maximize the utility of their alternator system.
The landscape of automotive electrical systems is vast and continuously evolving. Staying informed about advancements in alternator technology and wiring configurations will greatly enhance any automotive project. It’s not just about choosing the right parts but understanding how these components interact to create a reliable power source for your vehicle.
In conclusion, meticulous attention to the wiring diagram and installation nuances of a GM 1 wire alternator can result in a rewarding experience for any automotive enthusiast. Appreciate the harmony between design simplicity and operational efficiency inherent in this system and recognize that proper installation and maintenance play critical roles in its performance.
