
When the air conditioner fails to deliver that refreshing chill on a sweltering summer day, it can feel like a frigid breeze in the desert— a moment of desperation amidst the heat. One often overlooked hero in the world of air conditioning is the Hard Start Kit, a vital component that can revive your AC unit when it falters. Understanding the wiring diagram of a Hard Start Kit can make the difference between sweating it out or enjoying a cool, comfortable space.
To navigate this technical terrain, we first need to dissect the anatomy of a Hard Start Kit. In essence, it is a collection of components designed to give your air conditioning unit that initial push it craves when starting up. Think of it as an espresso shot for your AC, surging energy through the system with vigor. The hard start kit works by enhancing the starting torque of the compressor, mitigating the strain that could otherwise lead to overheating or failure. This is especially crucial for older systems that may struggle to turn over in the sweltering heat.
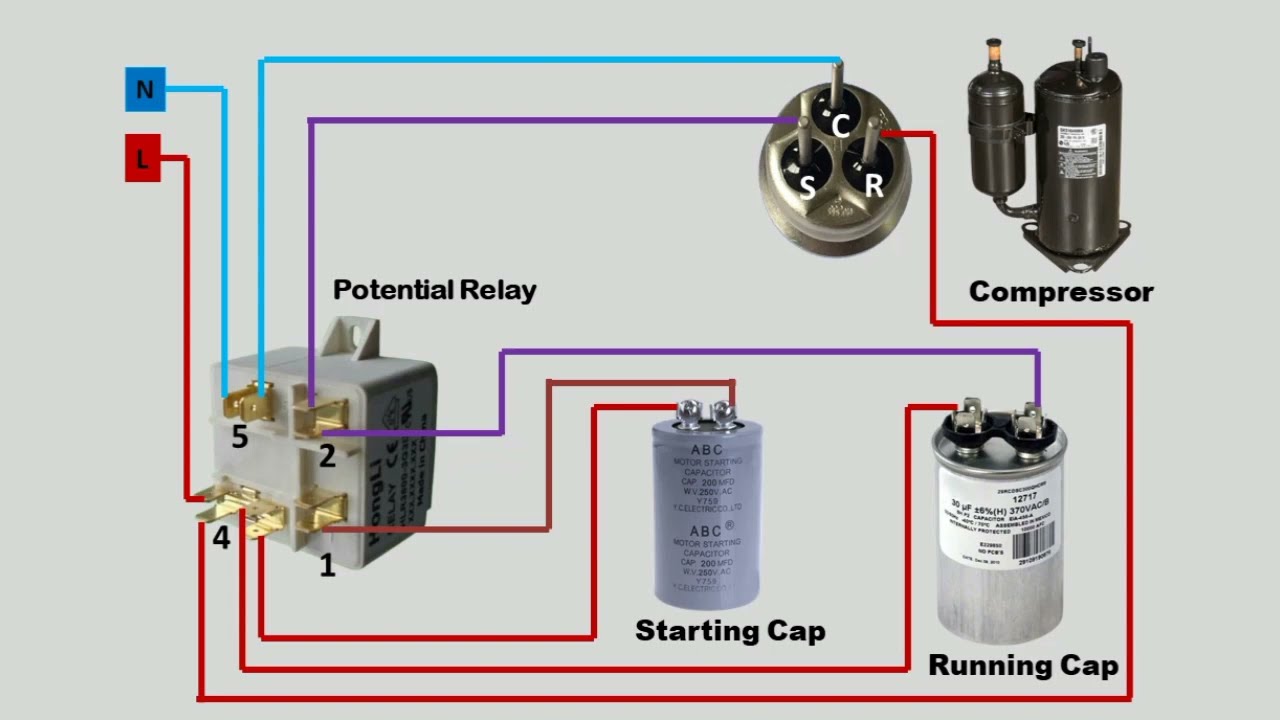
Take a moment to envision the wiring diagram as a map leading to this oasis of coolness. Each line, terminal, and component plays an integral role, much like the intricate pathways of a bustling city. For the uninitiated, it may appear to be a labyrinth, but decoding this map can provide clarity and empowerment.
The primary components of a Hard Start Kit include a potential relay, a start capacitor, and the compressor itself. The start capacitor, akin to a charged-up athlete at the starting line, stores and releases energy for a quick burst when starting the compressor. On the other hand, the potential relay acts as a switch, determining when to disconnect the capacitor once the compressor is up and running smoothly, giving it the green light to operate unencumbered by extra weight.
To get started with your do-it-yourself (DIY) repair, you’ll first want to familiarize yourself with the wiring diagram. It’s essential to understand the connections between the various components. In this world, imagine the diagram as the threads of an intricate tapestry; each thread is vital for the overall picture to emerge as functional. Typically, the potential relay will connect to both the compressor and the capacitor. Follow the lines closely, as they often travel through terminals that resemble small junctions along a road network.
Let’s embark on the journey of installation, shall we? First, ensure that all power to the air conditioning unit is shut off. Safety should be your faithful companion on this adventure. Once you’ve taken precautions, you can locate the compressor and refer to your diagram to find the terminal points for the capacitor and relay.
The start capacitor will usually have two terminals that connect directly to the compressor’s terminals. The potential relay will typically attach to both the capacitor and the compressor as well, serving as a bridge between the two. The beauty of this system lies in its simplicity. Despite the many components involved, they work in harmony, turning chaos into a reliable cooling experience.
As you tighten the connections, think of them as the bonds of friendship, each nut or screw ensuring that your AC and its components operate as one cohesive unit. Ensure that the connections are firm, because, like an artist’s brush on canvas, a loose connection could lead to unwanted imperfections.
Once everything is connected, turn the power back on and test your fix. Listen closely as the compressor hums to life, reminiscent of a concert’s opening notes—a glorious sign that all the preparations have borne fruit. If, however, your energy-infused plans do not bear the fruit of cool air, do not despair; troubleshooting may still be necessary. Check your wiring for any loose ends or faulty components. Remember, a meticulous eye can catch even the faintest misalignment.
Now that you have embarked on this technical expedition, reflect on the rewards. Fixing your own AC unit not only saves you money but also grants you the satisfaction of self-sufficiency—a badge of honor only a true DIY enthusiast understands. There’s an intrinsic joy in conquering a seemingly complex task, akin to unraveling the secrets of an ancient puzzle.
Furthermore, understanding the intricate dance of your Hard Start Kit’s wiring diagram opens a gateway to further knowledge. This newfound expertise not only enhances your relationship with your air conditioning unit but primes you for future repairs. You become the sorcerer of your own cool kingdom, wielding knowledge that many would hastily outsource to professionals.
In conclusion, embarking on the journey to understand and install your Hard Start Kit is not merely an exercise in mechanics; it’s an exploration into the realms of self-reliance and ingenuity. As summer’s heat waves come crashing in, be the refreshing breeze that disperses the sticky humidity around you. Remember, the world of DIY air conditioning repair is not only accessible but also empowering, inviting you to master the art of cool.
With the right knowledge and a bit of patience, you can ensure that your oasis remains ever serene, transforming the discomfort of heat into a state of blissful coolness. Embrace your inner technician, and let the soothing air flow!
